This is the first of a series of eight webpages which will teach you different techniques used in traditional American block patchwork.
Each section will include full instructions for two Star blocks using the technique; one easy and one more difficult, so that you can practice and develop the skills. These are free to download. You could use these blocks to make a Sampler Quilt at the end if you wish.

This instalment will teach you about half-square triangle units. As the name suggests, this is a square made up of two right-angled triangles made of different fabrics.
These are easy to make, and incredibly useful, as there are so many different blocks which use them, either on their own, combined with squares, or with other more complicated units.
Making half-square triangles
You might think that you do this by cutting out two triangles and then stitching them together, but it is actually quicker and more accurate to make two at a time from squares, using a “quick-piecing” technique. Watch this short video to see how it’s done:
Its easy to work out what size of squares you need to cut for this technique – you simply add ⅞” to the finished size that you want (this size refers to the finished size after you have stitched all the pieces together, after all the seam allowances have been used up).
So, for example
- to obtain a 3″ finished half-square triangle unit , you need to cut a Dark and a Light square that both start 3 ⅞”
- to obtain a 4″ finished half-square triangle unit , you need to cut a Dark and a Light square that both start 4 ⅞”
- to obtain a 6 ½″ finished half-square triangle unit , you need to cut a Dark and a Light square that both start 7 ⅜ ”
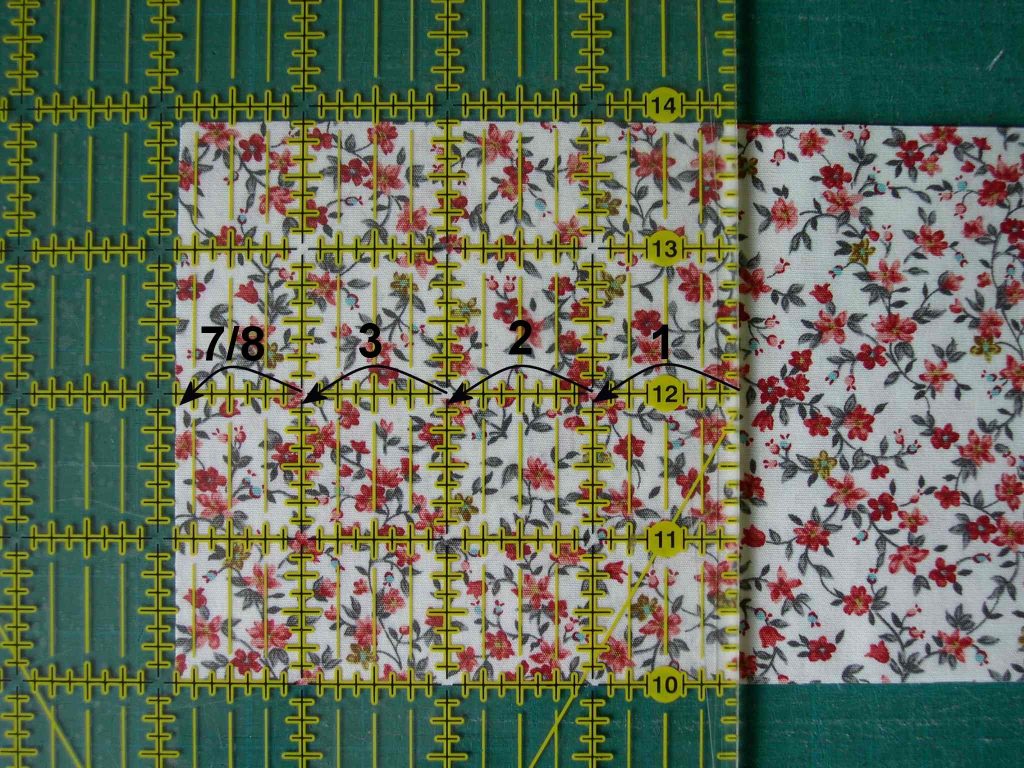
Some people worry about cutting such a strange measurement – its not really any more difficult than cutting, say 3 ½ ″ squares, as long as you have a good ruler with the right marks on – most do, although you may not have noticed them. They are the last little tick marks just before the inch lines.
Full details, including close-up photos can be found in this webpage about rotary cutting. Alternatively, you can cut the squares slightly larger, to the nearest inch, and then trim them down – but its quite a lot of extra work!
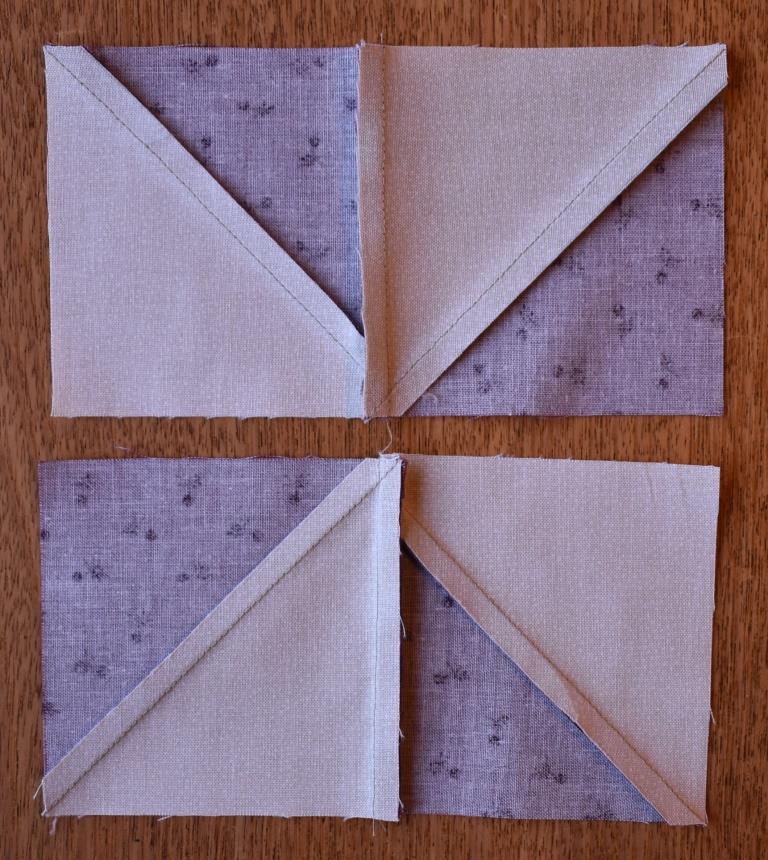
Pressing half-square triangle units
When you have made the half-square triangle units, they need to be pressed with the diagonal seam allowance to one side. Quilters will often tell you that this should be behind the darker fabric – but my patterns will often overrule this in order to get sharp points. There is more about that in this webpage “Pressing for Perfect Points” if you are interested in knowing how to work out the best pressing direction for yourself – but for these Skilful Skyful blocks, I will just tell you which way to press them for successful results.
If you have made these units before, you may be frustrated that your half-square triangles don’t lie flat, become distorted, or end up with a little tuck along the seamline. This next video shows a good pressing tip to avoid this:
Assembling blocks using half-square triangle units
I have prepared two free patterns for blocks using half-square triangles which you can try out. I have used some lovely plain and semi-plain Makower fabrics that I was given – more details about these can be found in the webpage about Planning a Sampler Quilt. One of these blocks is easier, and one is a little more difficult.
It’s quite useful to know what makes a block easy or difficult, as it can be quite deceptive!
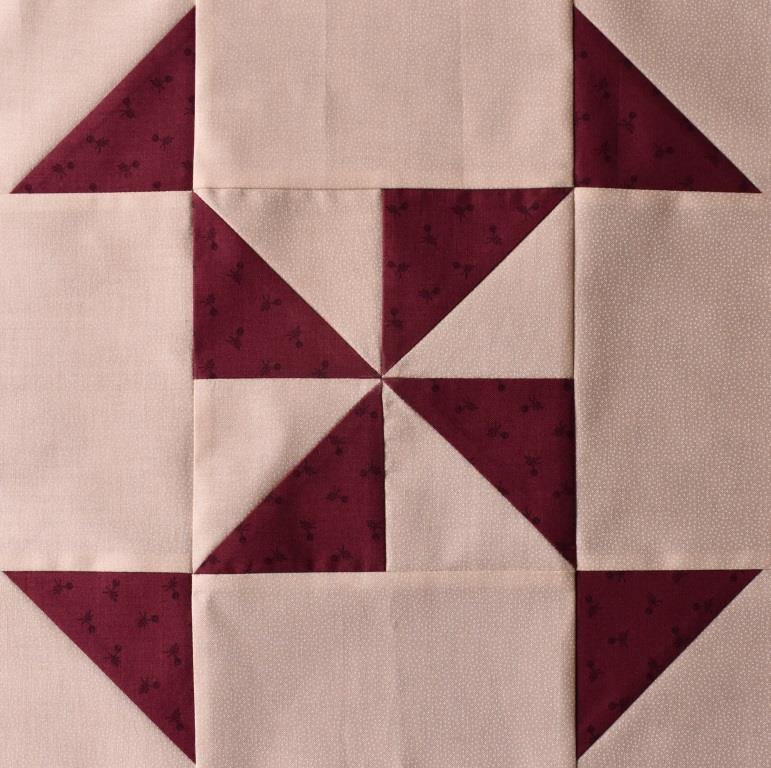
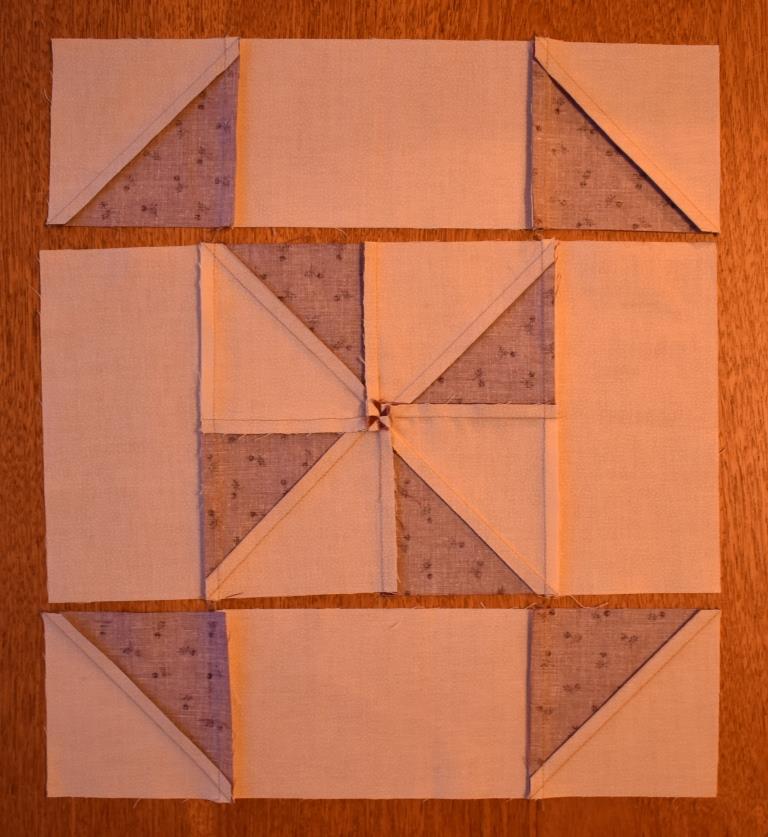
This first block is called Windmill, and its quite easy. What makes it more straightforward?
- There are only two colours of fabric
- It has some rectangles – squares or rectangles are always easier than triangles with sharp points!
- Most of the triangle points don’t meet other triangle points, so there are fewer tricky places.
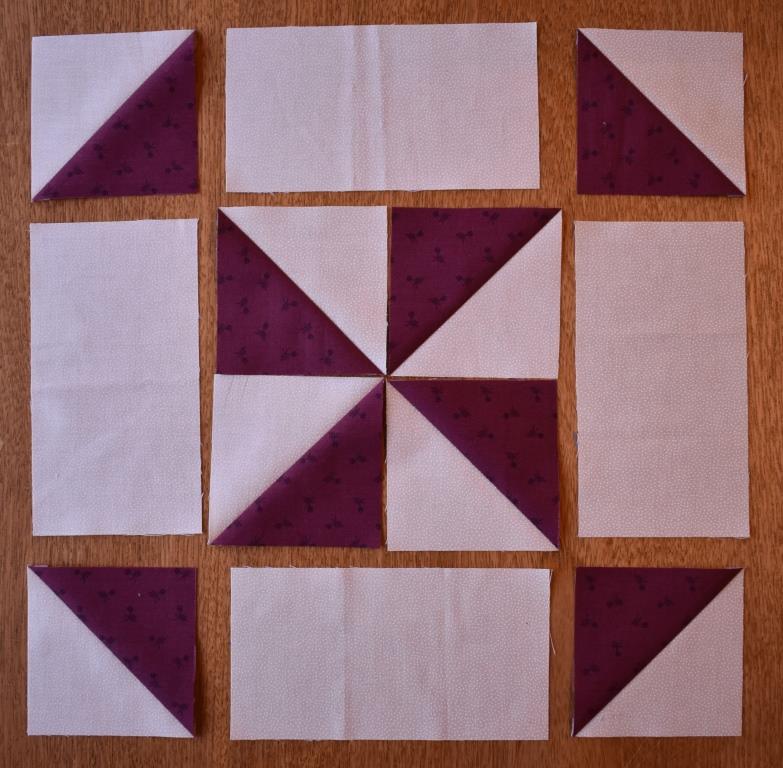
How do you stitch this together? First of all, download the free pattern, and use it to cut out all the pieces. Quick-piece the half-square triangle units (the pattern tells you what size to make these).
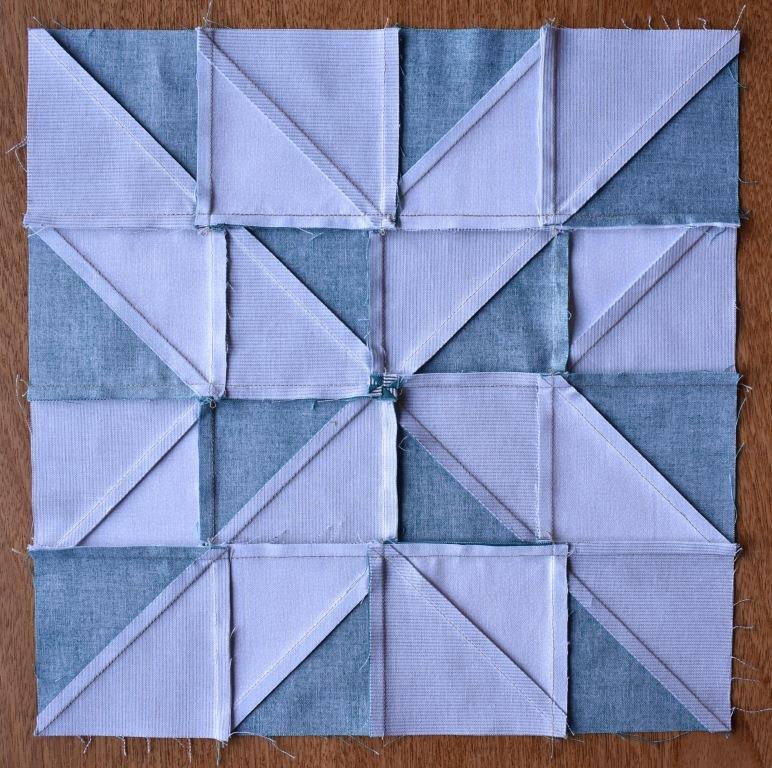
Now lay out all the pieces, checking carefully that you have all the half-square triangles the right way round! As you can see from the corner units in this block, there are four different possibilities for this, and the block would look very odd if just one was turned round by mistake. These all need the dark corner pointing towards the centre.
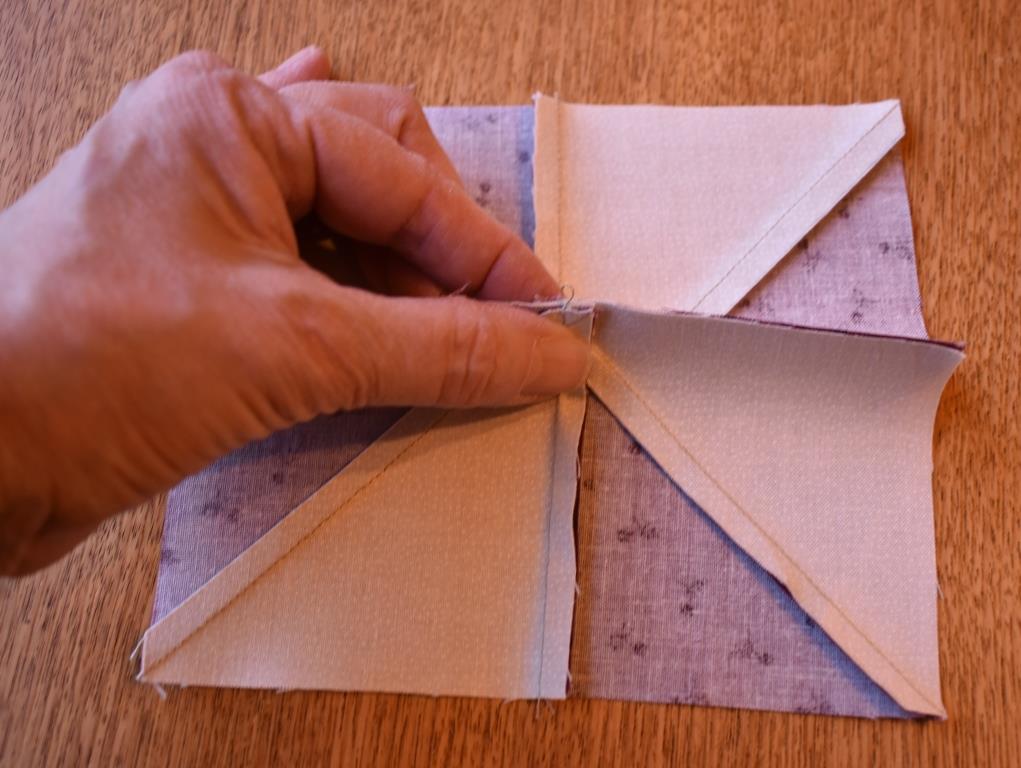
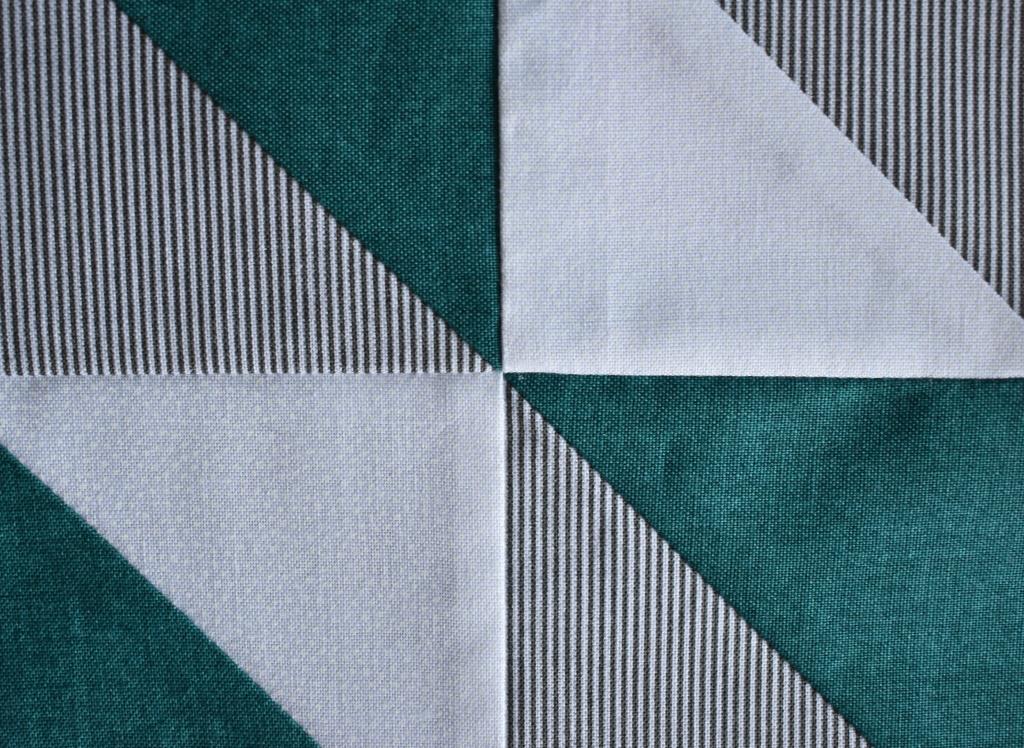
You will notice that the four half-square triangle units in the centre form a pinwheel – we are going to make this section first.
The pressing direction of the seams has been worked out so that everything meets pressed in opposite directions – vertical seams and diagonal seams.
Shuffle these together until all the seams feel smooth and flat between your fingers.
Watch the first half of this video to see how I make the pinwheel have a perfect point at the centre.
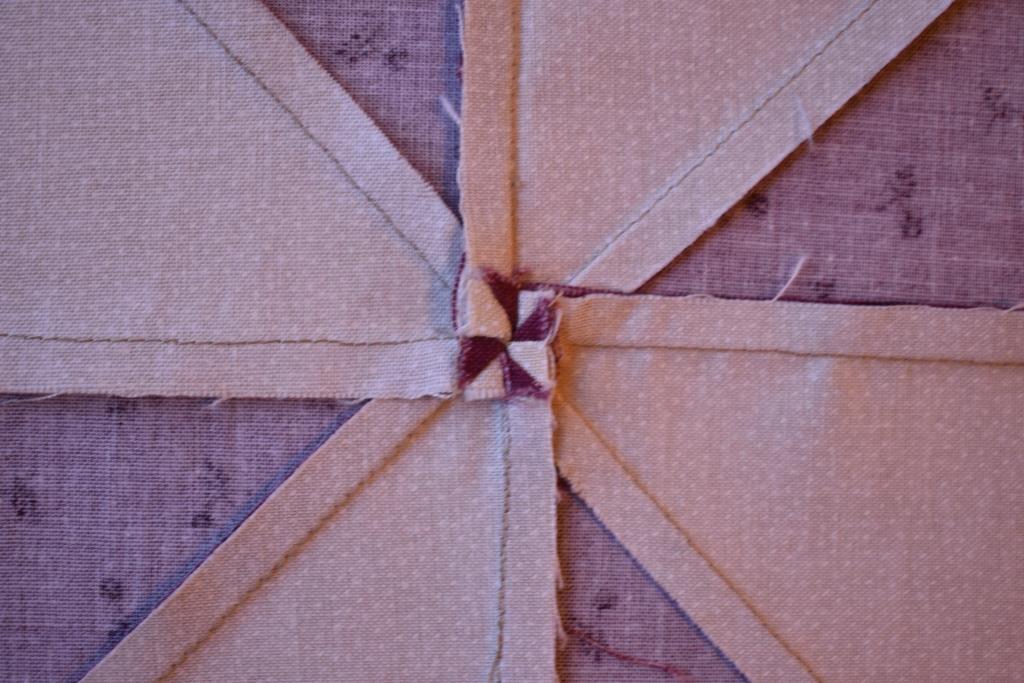
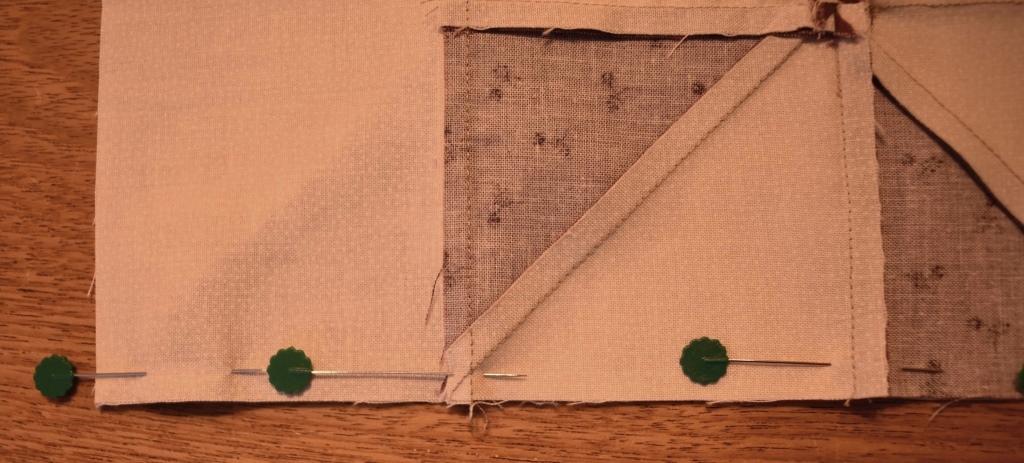
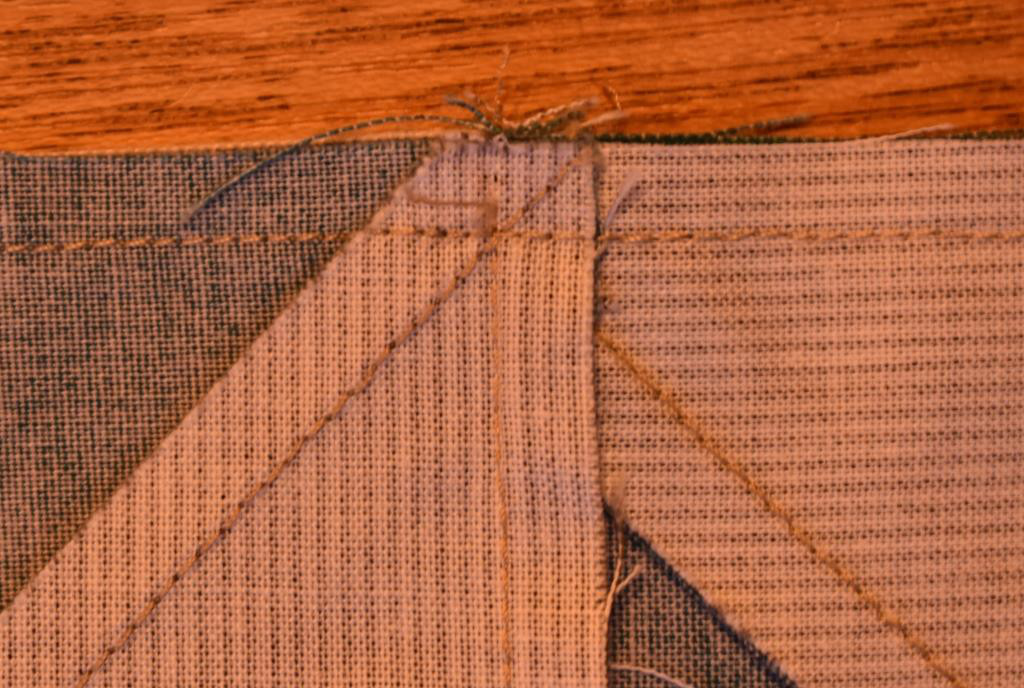
An extra little tip is to unpick the last couple of stitches of each vertical seam where they meet at the pinwheel centre.
This allows the two halves of the seam to be pressed in different directions, so that the seam allowances can swirl round as shown here, which reduces the bulk at this important junction.
Once the pinwheel has been made, lay out all the block pieces again, ready to stitch together.
It is really important not to turn round any of the pieces during the stitching process, as this would spoil the design. The best way to avoid this is to string piece the block together. Watch this video (of me stitching a similar block) to see the process:

So, for the Windmill block, the first step is to turn the units on the right hand side over onto the centre, pin and stitch down this column, string-piecing the pieces together.
The pattern then suggests pressing the central seam from the pinwheel out towards the rectangle – this reduces bulk. This choice also exposes the crossover of the vertical and diagonal seams just made – these form the point of the triangle, so it is useful if this can be seen when stitching the row seams next, so that you don’t chop off the point. You can read more about this on the “Don’t Chop off the Points” page.
Press the other seams so that they go in the alternate direction – conveniently, this also reduces bulk from the half-square triangle, and again exposes the crossover of the previous stitching on the outside edge for when the block is eventually assembled into a quilt.
Then turn over all the units on the left hand side.
Insert the pins going in the other direction this time – you will find it easier to turn it all round and have the bulk to the left of your needle while stitching.
Your block is now held together, with those little “strings” temporarily joining the rows.
Finally, stitch the row seams properly.
Remember that you pressed the vertical seams in alternating directions, so they can now be shuffled flat where they meet, making the seam lines meet perfectly.
Stitch with the pinwheel side on top, so that you can see the crossover of the previous seams, and stitch through them to keep those points perfect. The middle pin in the photograph shows the place where you should stitch.
Press these row seams towards from the centre – although this folds back the bulkier Pinwheel unit, it has the advantage that it exposes the crossover stitching at the outside edge, which will be helpful when the block is eventually assembled into a larger quilt
You can download the full instructions for the pattern from my online Shop. These are free – maybe you would like to share this link with your friends if you like the results?
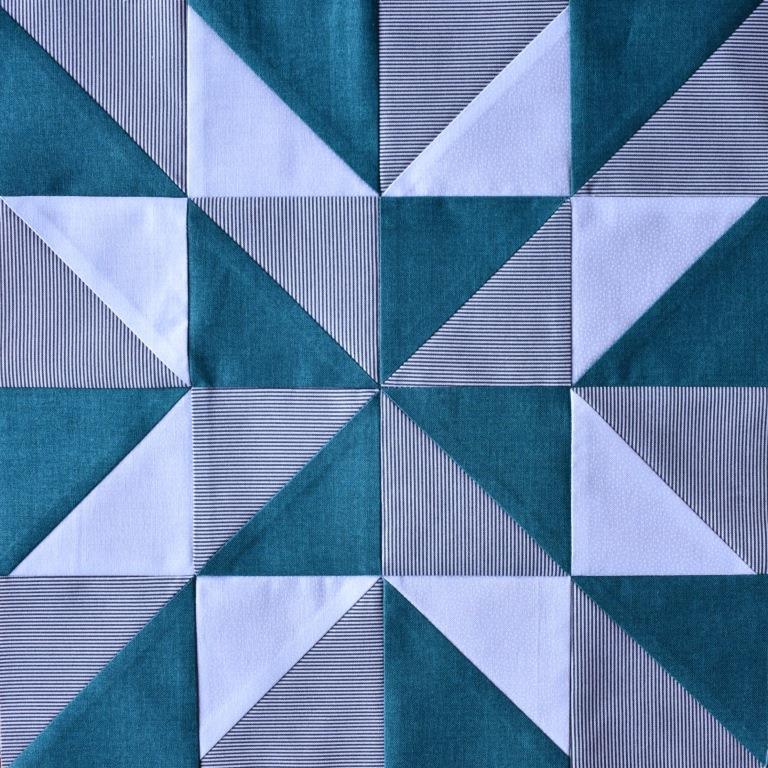
The second block is called Margaret’s Choice.
It has the same pinwheel centre, but in addition to needing an extra fabric, it is trickier because it has lots of places where the triangle points meet!
Again, download the free pattern to see how many pieces to cut out from each colour.
Make the half square triangles, and press the diagonal seams in the direction indicated in the pattern – this is really important this time, as there are so many places where the diagonal seams meet, so you want to get all those perfect points.
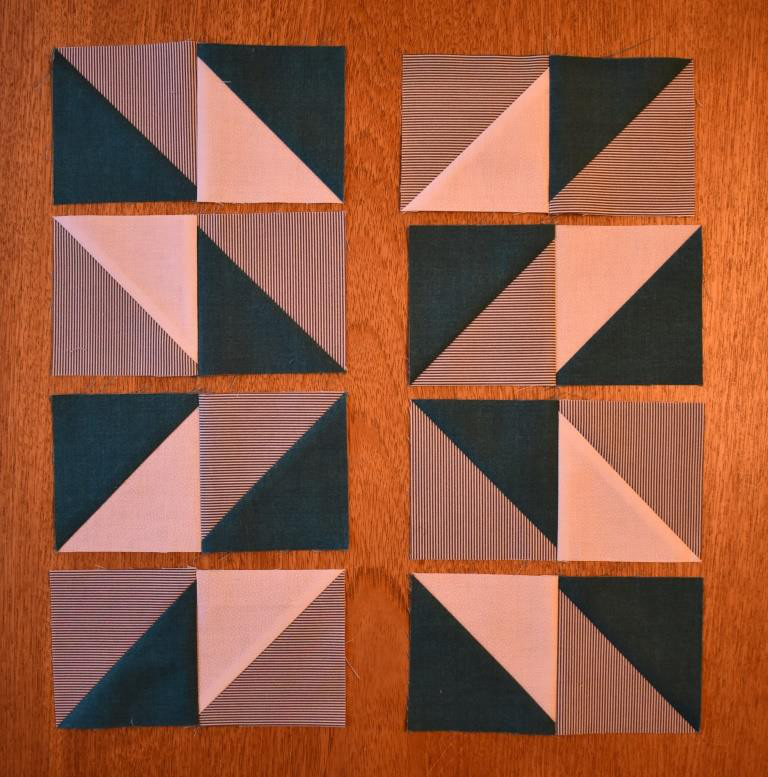
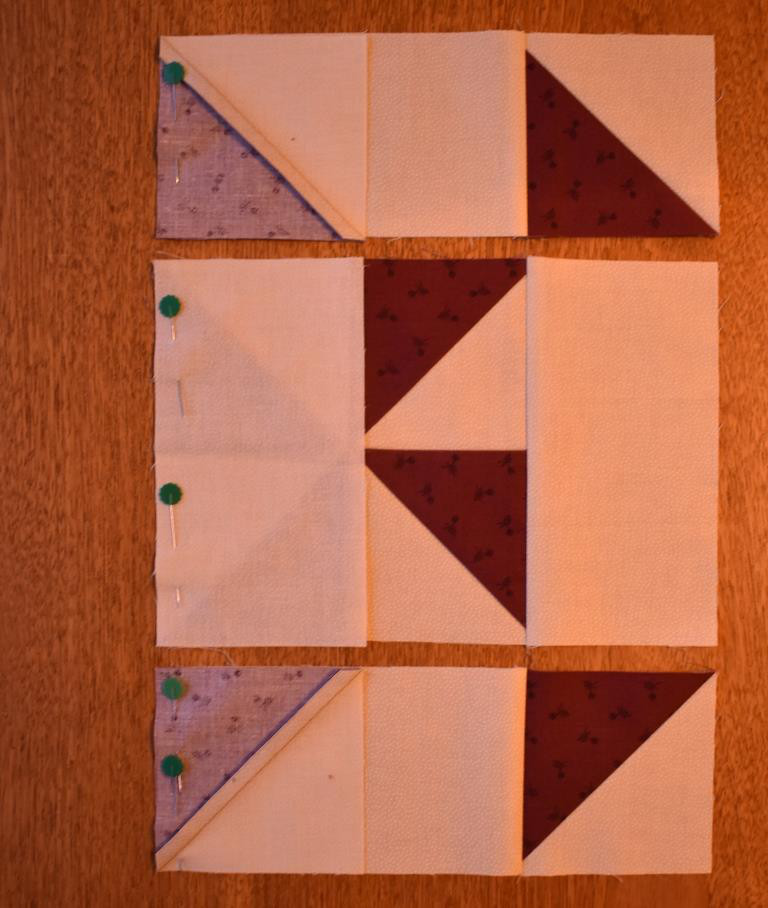
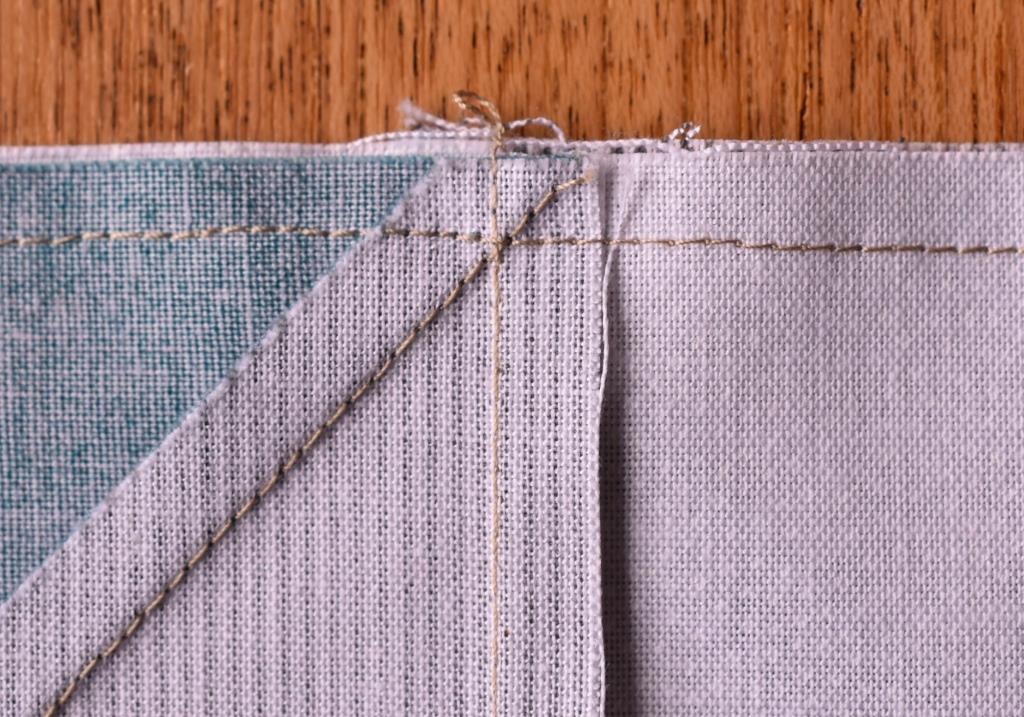
String- piece the block together – this photo shows two of the three sets of column seams stitched. Check that you join the pinwheel edges next. Don’t cut the little threads – these stop you turning a whole row round by mistake before stitching the next stage!
Remember to press the seams so that they alternate, ready for a good line up when you stitch the row seams.
In this four-patch block, it is unfortunately impossible to choose pressing directions which expose all the crossover stitching of previous seams – as this block is entirely made from half square triangles, whichever way you press will be good for one, but bad for the one next to it!
Here, you can see the crossover point for the left hand unit, but not for the right hand unit – but it wouldn’t help to press it the other way, would it?
There is one place which often causes frustration when stitching the row seams in this block.
Look where these two diagonal seams are between the Dark and Medium fabrics – what you want is for them to form a continuous line like this. But its not as easy as it looks!
Start by shuffling the vertical seams until they nestle – this will make sure that these line up well. Pin through the junction along the ¼” seamline, and open it up to see whether the diagonals look right – the first time you do this, they probably won’t…….
You may need to shift one layer up or down by sliding along the vertical seam a tiny amount, to get the diagonals to be in the correct position to form a continuous line. This may mean that the fabric edges don’t quite line up with each other perfectly, but (as long as you have at least ⅛” seam to hold it together securely) that doesn’t matter as much as what it looks like on the front!
If you are worried about getting this right, tack in place, or stitch with a longer machine stitch first. If it is correct, you can simply stitch over it again with a normal stitch length; if it is wrong, it is easier to unpick and try again.
It is generally always safer to stitch slightly to the seam allowance side of the intended line – if you then decide you could come in a tiny bit, that part of the seam can be re-stitched without the need to unpick the first line.
This is what your Margaret’s Choice should look like from the back – but even if it has a number of “fudges”, only you will know they are there. All others will see is the front!
The next blocks in the Skilful Skyful series will teach you how to make and use Quarter-square triangle units.
The whole series covers:
- Half-square triangles
- Quarter Square triangles
- Flying Geese
- Square-in-a-Square
- Four-Square
- Half/Quarter Square triangle
- True Eight Point Star
- Half-Rectangle Triangles.
I hope that you will be able to transfer the tips that I have given you into your own work, using them for any traditional block. However, you may prefer to let me do the thinking for you, pre-planning the pressing direction of every seam to give the flattest junctions, and hence perfect points. If you would like to make a larger project from one of my patterns which uses half-square triangles, why not have a look at the other projects, such as the Provencal Sampler, Double Cat, Northern Lights or Friendship Star available in my online Shop?